

How to Use the iPad Home Screen
Contents
Home Screen Settings
How to Move Apps on the Home Screen
How to Remove Apps from the Home Screen
How to Create Multiple Home Screens
How to Rearrange Home Screens
How to Hide a Home Screen
I'm going to start this tutorial by mentioning a topic that won't be included this week. I won't be explaining how to use and change the home screen's wallpaper (the background color/image on the screen) because Apple's developers have decided to make changing it unduly complicated in iPadOS 17. I experimented with it last week, and it took me awhile to figure out how to do it without also changing my lock screen image. I'll do a future tutorial on changing the home screen and lock screen wallpapers.
I've included a number of screenshots to make the instructions clearer for you. To ensure that the page will load quickly, I've reduced the size of the images but you can make them easier to see by enlarging them. Just pinch out with two fingers on an image and it will be easier to view the details in it.
I've added a few very short videos at the end of sections where I felt a video might help some users. Since videos usually slow down loading of a webpage, I've posted the videos on a separate website. If you want to view a video, just click the link to the video and after viewing it, click the "Back" link on that page to return to this one.
Now, on to learning how to use the home screen.
Home Screen Settings
The first thing I usually do when I get a new device is head straight to the Settings app. This is the gray gear you probably have on the left side of your dock (the bar on the bottom of the home screen). Let's take a look at the Home Screen and App Library settings. I'm using iPadOS 17 for this tutorial, so if you have an older version of the operating system, it might be labeled differently (it's Home Screen & Dock in iPadOS 15).
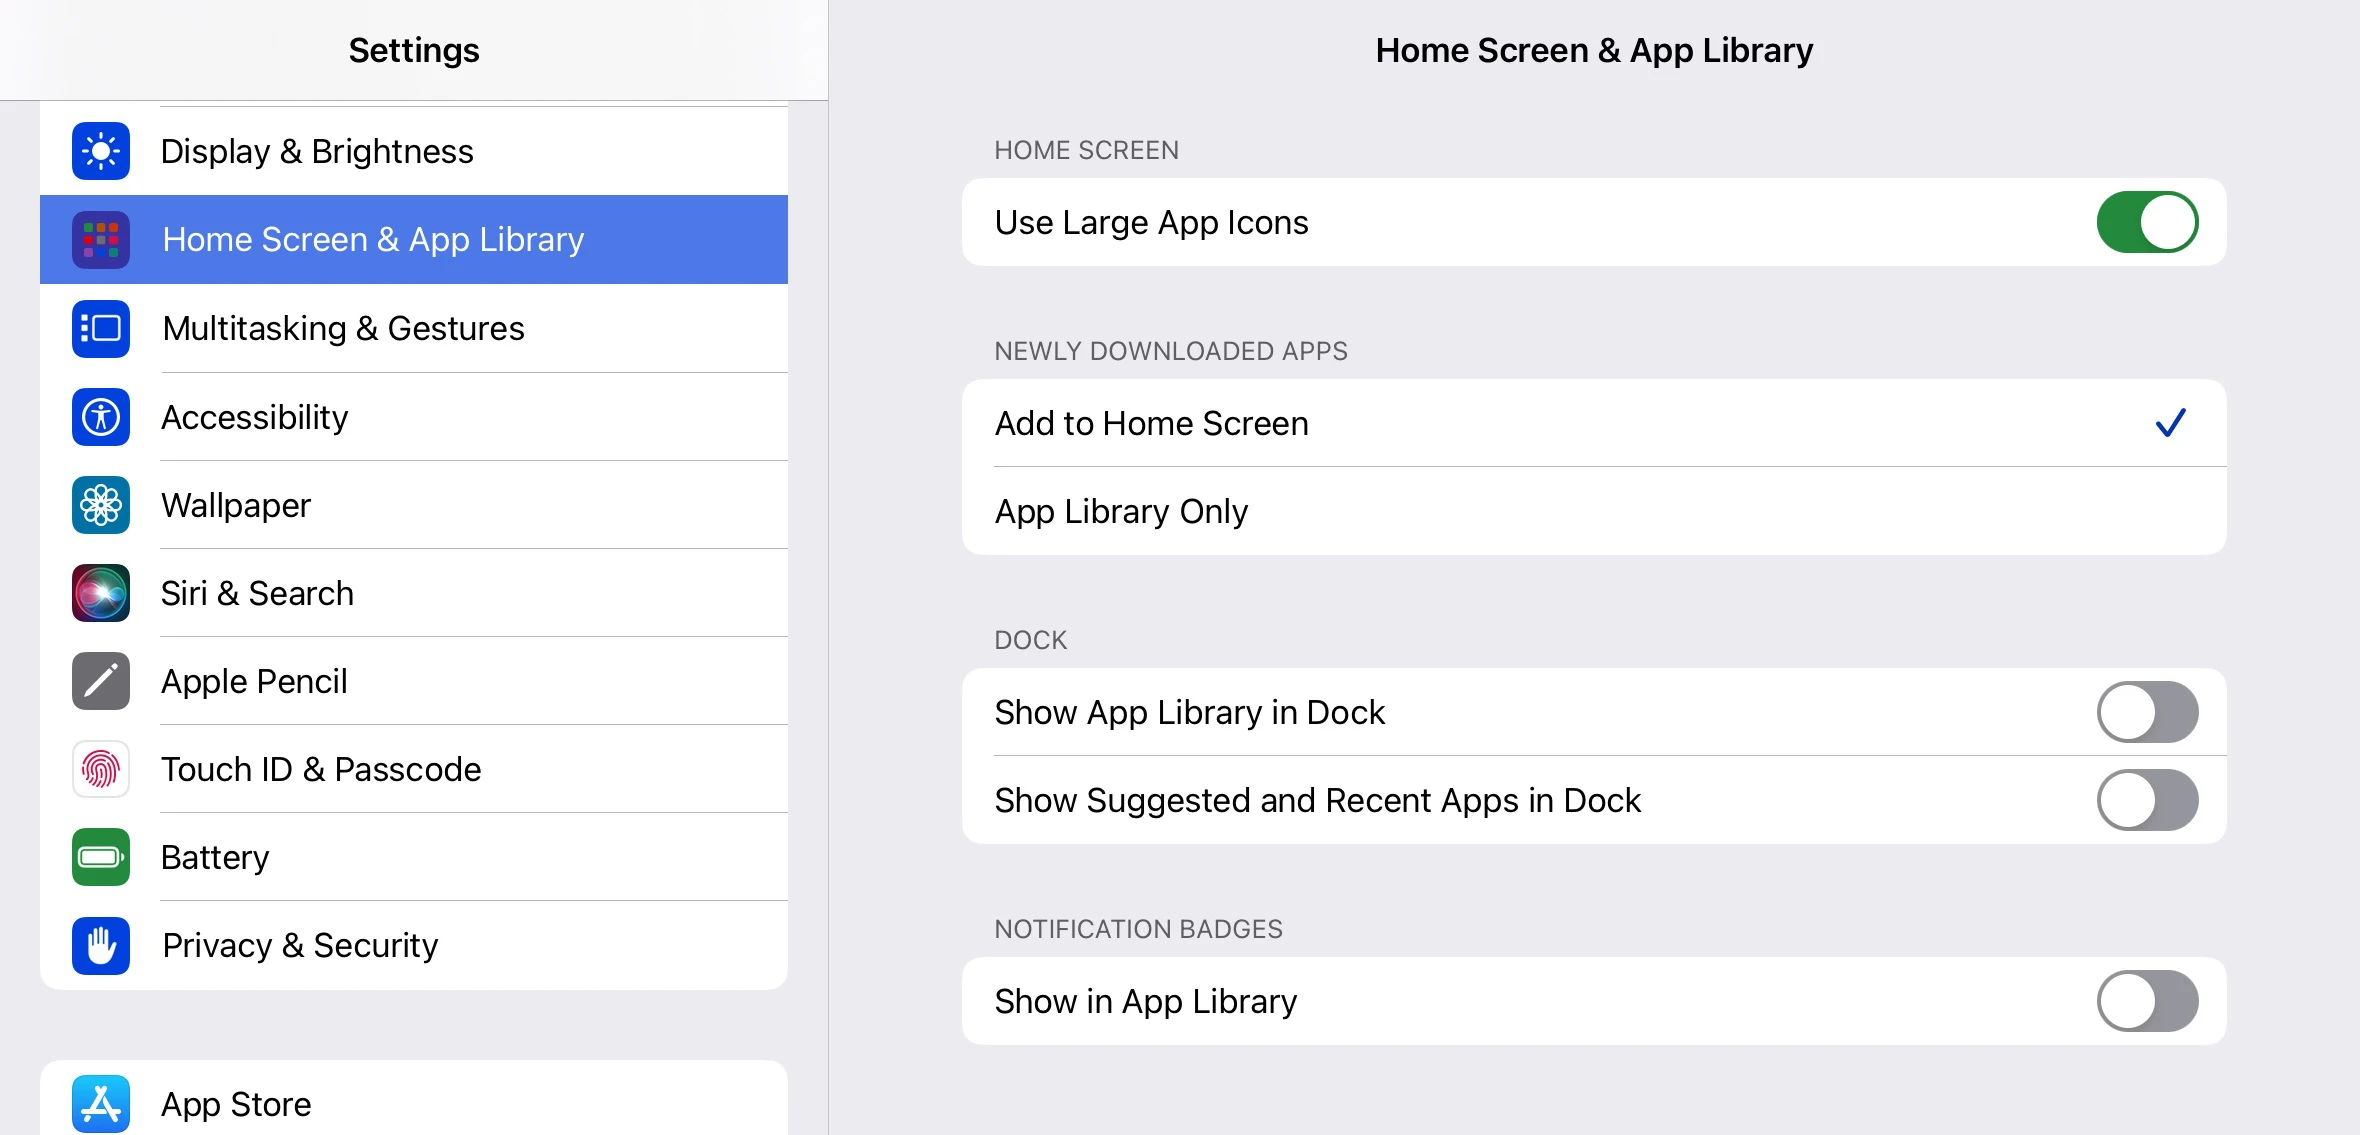
The first setting is for the size of the icons on the home screen. I have it set for large app icons since I'm working on an iPad Air 5, but you might prefer the small icons if you're on an iPad Mini. I also like larger icons because I prefer to keep a reasonable number of apps and folders on my first home screen and use a second or third home screen for lesser used apps. Try the different sized icons and see which is more appealing to you.
If you want any apps you download from the App Store to appear on your home screen, make certain to check "Add to Home Screen" for the next option in Settings. Checking "App Library Only" means you won't see a downloaded app on your home screen and you may be wondering if the app was actually downloaded. For this tutorial, keep the rest of the options on the Settings page turned off. We'll turn one on in the next tutorial (tomorrow), and another one the following day.
How to Move Apps on the Home Screen
You might want to reorganize the apps on your home screen to make them easier to find. Doing this can be a little tricky at first. You need to follow a few steps:
- Long press on the home screen until the apps "wiggle or jiggle". In early versions of iOS, you could long press on an app to get the same effect, but now doing that will bring up a menu, so just put your finger on the home screen and hold it there until you see the apps "wiggle or jiggle or shake."
- Next, put your finger on the app you want to move. Hold your finger steady and tight on the app and move your finger and the app to its new location.
- After the app is in the location you want, tap on the home screen (not on the app) to stop the wiggling.
If in the first step, you pressed on the app instead of the home screen, a menu popped up with an option to "Edit Home Screen." Selecting this option will also work to make the apps wiggle.
When moving an app, you can only move it to an existing row on your home screen. Only widgets (a later tutorial) can be moved to empty spaces anywhere on a home screen.
Here's a link to a short video on how to move apps on the home screen: Moving Home Screen Apps Video
How to Remove Apps from the Home Screen
There are two ways to remove apps from the home screen. The first way follows the first step for moving apps - long press on the home screen to make the apps wiggle. You'll then notice a minus sign in the top left corner of the app.
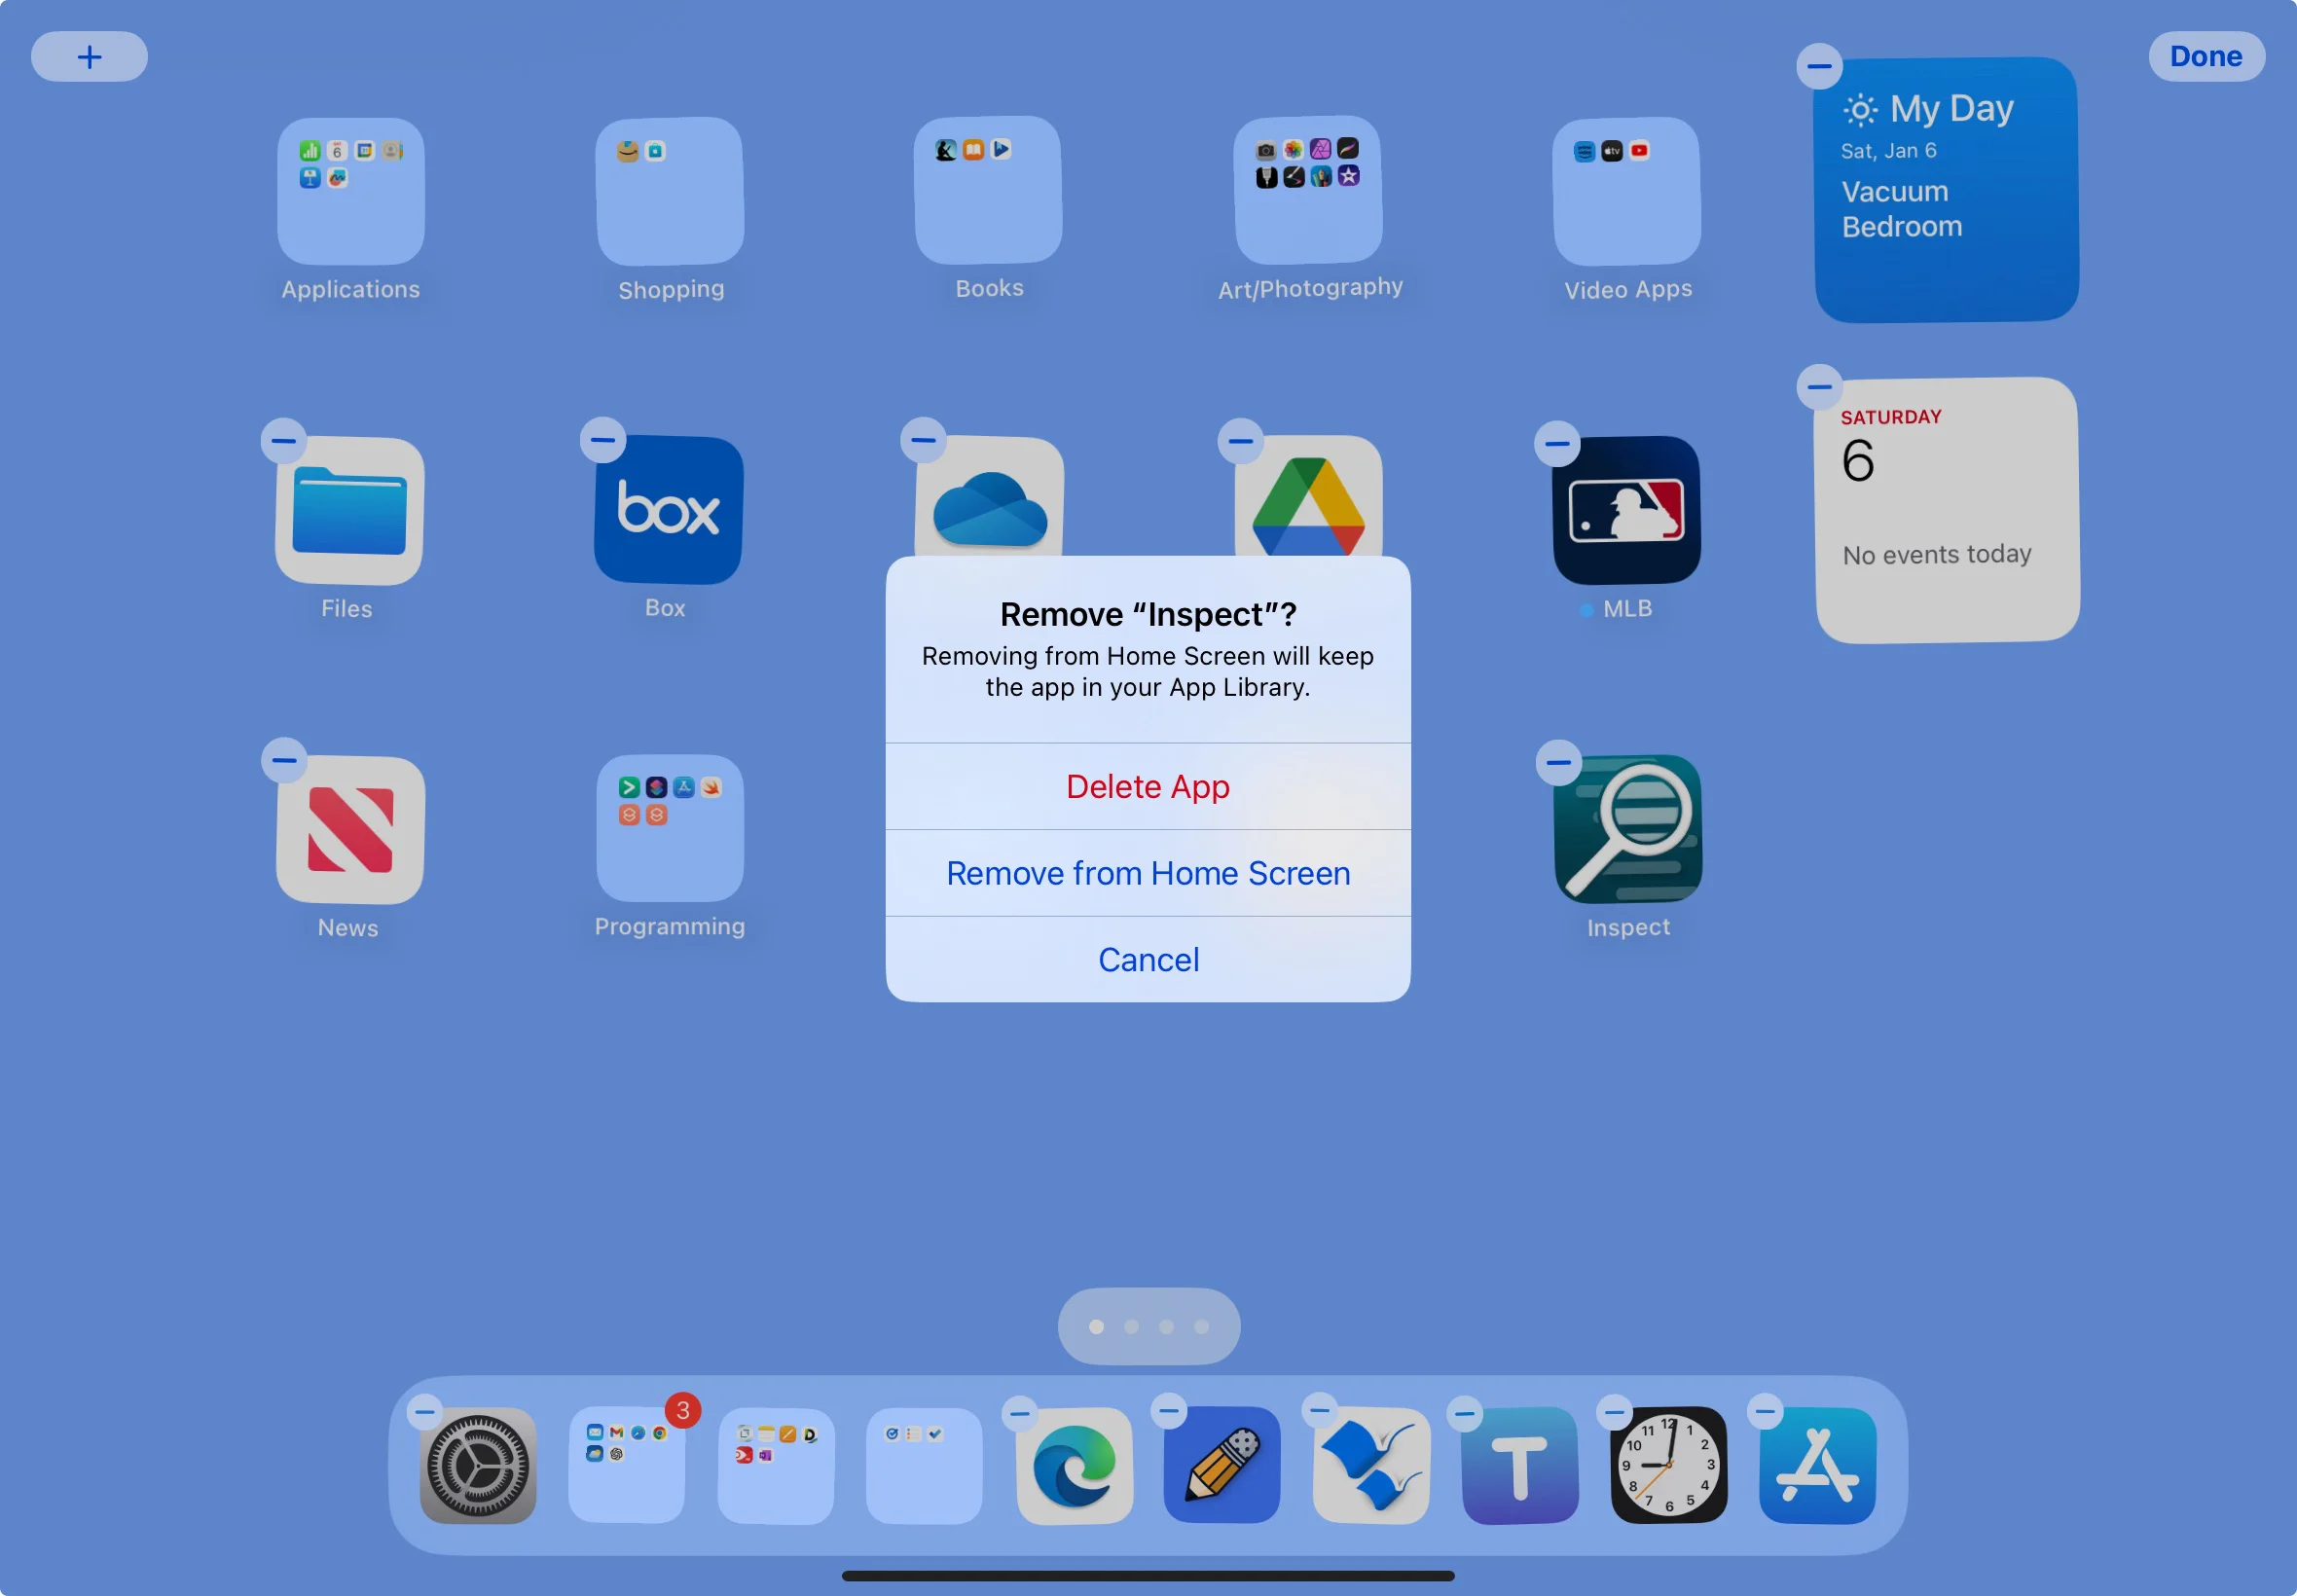
Click the minus sign and you'll get three options:
- Delete App - This will completely remove the app from your iPad. Do this only if you don't want to use the app at all. If you do this by mistake, you can redownload the app by finding it again in the App Store.
- Remove from Home Screen - This is the option you want if you only want to remove the app from the home screen, but still keep it on your iPad. It's one way to hide apps you don't use very often. You can still find the app by using Spotlight search, Siri, or the App Library (more on those options later this week).
- Cancel - Use this option if you've changed your mind about removing or deleting the app. This will not stop the wiggling however, so after using this option, touch your finger on the home screen to get back to the normal home screen.
For the second way to remove an app, long press on an app and you'll get a menu that includes "Remove App," either at the top of the menu or the bottom of the menu. Clicking that option, will bring up the menu with the three options listed above.
How to Create Multiple Home Screens
One feature that hasn't changed since at least iOS 5 is the ability to have more than one home screen. You can have as many home screens as you want as long as there is at least one app on each screen. I like to move apps and folders I don't use very often to a second or even a third home screen.
To move an app to a new home screen do the following:
- Touch the home screen until the apps wiggle.
- Touch and hold the app you want to use to create a new home screen. Move the app to the right along the center of the screen until it moves to a new home screen. It might take some practice to get it to move to a new screen. Just keep your finger on the app and move it in a straight line along the center of the screen until it opens up a new home screen. When you get to a new screen, lift your finger off the app and it will move to the top left corner of the screen.
Here's a link to a short video showing how to move the app: How to Create a New Home Screen on an iPad.
Once you have multiple home screens, you can move between the screens by swiping left or right with one finger anywhere on the screen. If you swipe past the last home screen you created, you'll discover the iPad's App Library (tutorial coming soon) on the very last screen. According to Apple's documentation, you can return to the first or main home screen from any other screen by swiping up from the bottom of the screen. However, this doesn't work consistently for me, so there might be a trick to knowing exactly how and where to swipe. Also, it doesn't work if you're on the App Library screen.
How to Rearrange Home Screens
You might find that after creating several home screens, you would rather have the apps that are on screen two on screen three or four. Instead of moving the apps, you can rearrange your home screens. To move your home screens to new locations, follow these steps:
- Touch any screen to make your apps wiggle.
- There are now dots near the bottom of the screen (above the dock). Touch the dots and you'll see all of your home screens.
- The home screens are now wiggling. Touch and hold a home screen and move it to a new location.
- Tap two times on the background screen to stop the screens from wiggling.
Here's a short video on how to rearrange home screens: Rearrange Home Screens.
How to Hide a Home Screen
There might be times you want to hide a home screen. Perhaps you don't need the apps right now or maybe you just want to hide it from others who have access to your iPad. To hide a home screen, press on a home screen to make your apps wiggle. Next, tap the dots near the bottom of the screen. You'll see check marks under each home screen. Just uncheck the one for the screen you want to hide.

This concludes my tutorial on the iPad home screen for now. The next post will be on the iPad's dock, which is on the bottom of every home screen. Be sure and check back tomorrow to learn how to use the dock.
If you found this tutorial helpful, please share the link to it with your friends. How to Use the iPad Home Screen.
If you want to view the next tutorial, click the link below.
iPad Dock